


If your application needs to work with many forms and data collection flows, then writing forms in JSX(React) can be very repetitive. Even though we might try to extract the standard components, the core problem lies in displaying the right set of inputs according to the type of form.
For Example, let's say you are building a car insurance registration form where the form needs to be dynamic according to the response of the user. In the first form, the user needs to enter his basic details and details about his automobile, and based on this info, different other forms need to be rendered to get the best insurance plan. Such as there is an input field for Is this vehicle owned, leased or financed? , and if the user answers saying the car is owned by the user then in the next form questions need to be asked about Is this vehicle registered to the insured or a spouse? . If the user responds as the car is leased then in the next form. questions about the leasing company could be asked. And, similarly, another input field may occur if the user answers as financed.
Now, one way to do this would be by conditionally rendering the above-mentioned fields according to the response of the user and for this simple case, it may be reasonable as well. But, let us imagine that the form grows in size and number and different fields need to be rendered according to the different responses of the user. We would have to keep track of all of the responses and render fields accordingly, the code becomes convoluted and unmanageable as it further grows. Not to mention adding validation rules, post-validation, and sending the complete data to the server according to the correct fields becomes super complex. So, how can we be able to tackle this simply? The answer is Schema Based UI. Let's have a look at it next.
First Step: Creating a Next js project
Let's start by creating a simple Next.js project using either npm or yarn. In this tutorial, I will be using npm. Run this command in your terminal.
npx create-next-app@latest
After the installation is complete, run npm run dev to start the development server.
Create a simple API route in Next.js:
After the creation of our project, the first step we need to do is to create a simple Next js API. For that, we can create a folder inside the pages directory of the Next.js project called API and in there create a file called input.js.
Inside the file, let's start by creating a simple array, that we will pass as JSON schema upon the response of the API
schema = [
  { id: 1, inputType: "TEXT", label: "What is your Name?" },
  { id: 2, inputType: "NUMBER", label: "What is your Age?" },
  { id: 3, inputType: "CHECKBOX", label: "Are you a driver?" },
];
In this Array, we have three objects and each object contains properties like id, inputType, and label. Now, let's create an API route by passing the above array as a JSON response with a status code of 200.
export default function handler(req, res) {
  res.status(200).json(schema);
}
Now, that we have created our API endpoint we simply have to invoke the API on our pages.
Creating the Form Builder Component
Now, we move to the index.js file and remove all the preexisting code there and write a component from scratch.
import React from "react";

const Index = () => {
  return <div>Index</div>;
};

export default Index;
The first thing we have to do is invoke the API that we created using fetch API call and store the response in a state variable called Fields.
import React, { useState } from "react";

const index = () => {
  const [fields, setFields] = useState();

  useEffect(() => {
    fetch("/api/input")
      .then((res) => res.json())
      .then((data) => {
        setFields(data);
      });
  }, []);

  return (
      <div>Hello World</div>
  );
};

export default index;
Now, our next objective is to create a mapper component to map the input type values present on the fields state to the respective inputs. For this project, I will be adding the library, Mantine UI for the inputs. You can install Mantine by installing the dependencies.
npm install @mantine/core @mantine/hooks @mantine/next @emotion/server @emotion/react
Okay so now we will create a new file called FormBuilder which takes the fields state as props and maps the element of the fields onto a new Component Called Dynamic Framework which will be the actual component responsible for showing the input UI fields.
import React from "react";
import DynamicFramework from "./DynamicFramework";

const FormBuilder = ({ fields }) => {
    return fields?.map((field) => (
      <DynamicFramework fields={field} key={field.id} />
    ));
};

export default FormBuilder;
Before we move on to create the Dynamic Framework component, we will need to have an Object mapper with its keys being the name of the inputs and the value containing the actual components. So we will create an Object Mapper named FieldFactory.
import CheckboxInput from "./CheckboxInput";
import FloatingInput from "./NumberInput";
import SelectInput from "./SelectInput";
import Input from "./TextInput";

export const FieldFactory = {
  TEXT: Input,
  NUMBER: FloatingInput,
  CHECKBOX: CheckboxInput,
  SELECT: SelectInput,
};
The input component files simply contain Mantine UI imports and return the Mantine components:
import React from "react";
import { Box, Text, TextInput } from "@mantine/core";

const Input = () => {
  return (
    <Box>
      <Text>Label</Text>
      <TextInput />
    </Box>
  );
};

export default Input;
Now, that our Object Mapper is done, we are ready to create the Dynamic Framework component. So, let's a create file called DynamicFramework.js. Inside the file, we will create a variable called component which will hold the mapped component. We will map the input type from the field to the Field Factory Object that we just created to get the desired input.
import React from "react";
import { FieldFactory } from "./FieldFactory";

const DynamicFramework = ({ field }) => {
  const component = FieldFactory[field?.inputType] || Input;
  return (
    <div>Dynamic Framework</div>
  );
};

export default DynamicFramework;
Now, that we have got the input that we want to render in the Ui, we will need to pass some extra properties that may be present on the field value like labels, options, etc, to the input components. We will pass these properties as props so we will use React's createElement.
import { Box, Input } from "@mantine/core";
import React, { createElement } from "react";
import { FieldFactory } from "./FieldFactory";

const DynamicFramework = ({ field }) => {
  const component = FieldFactory[field?.inputType] || Input;
  return (
    <Box w={500} m="auto" my={50}>
      {createElement(component, {
        meta: {
          label: field?.label,
          options: field?.options,
        },
      })}
    </Box>
  );
};

export default DynamicFramework;
React's createElement() will create an element of the type whatever input value is mapped and pass the field's properties like labels and options as props called meta. With this, we will be able to get the values in our input components and use them accordingly.
import { Box, Text, TextInput } from "@mantine/core";
import React from "react";

const Input = ({ meta }) => {
  return (
    <Box>
      <Text>{meta?.label}</Text>
      <TextInput />
    </Box>
  );
};

export default Input;
Now, that all of this is done our FormBuilder component is ready and we can simply render it in the UI and see the output on the screen.
import React, { useEffect, useState } from "react";
import { Box } from "@mantine/core";
import FormBuilder from "./FormBuilder";

const index = () => {
  const [fields, setFields] = useState();

  useEffect(() => {
    fetch("/api/input")
      .then((res) => res.json())
      .then((data) => {
        setFields(data);
      });
  }, []);

  return (
    <Box>
        <FormBuilder fields={fields} />
    </Box>
  );
};

export default index;
Output:
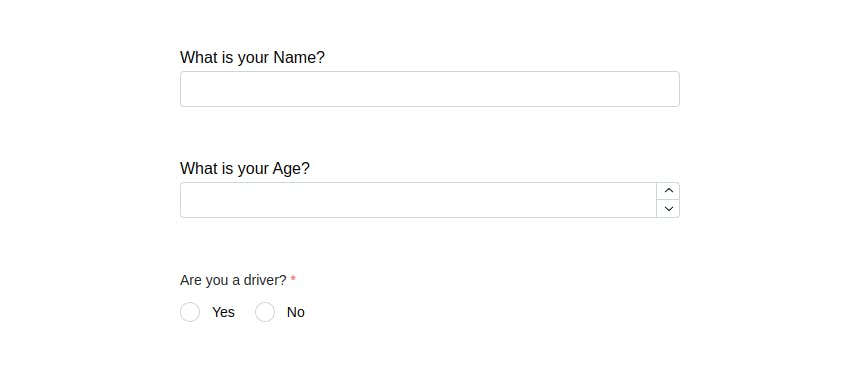
So, now what's great about this output is that everything that you see is dynamic. If we want to add another input then we can simply add another field-type object in the schema in the API input.js file like this and it will be rendered automatically on the screen.
const schema = [
  { id: 1, inputType: "TEXT", label: "What is your Name?" },
  { id: 2, inputType: "NUMBER", label: "What is your Age?" },
  { id: 3, inputType: "CHECKBOX", label: "Are you a driver?" },
  { id: 4, inputType: "TEXT", label: "At what age did you get your license?" },
];
Output:
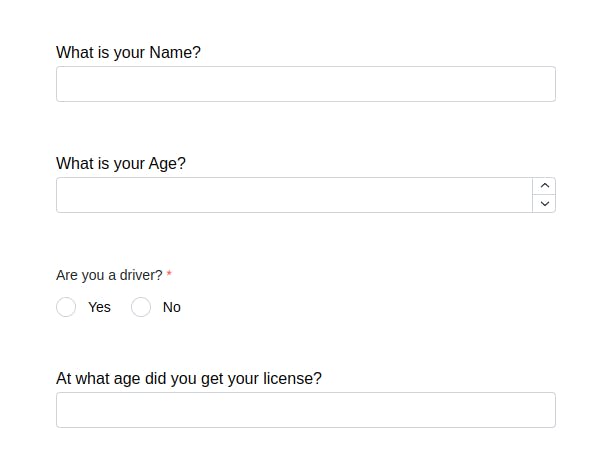
We can also add other inputs like TextArea, FileInput, etc, simply by adding the input components in FieldFactory and mapping through the API response just as did earlier. With this approach, the code looks super clean and manageable. This is fairly a simple example but the possibilities of this approach can be endless as we can add validation regex to the API schema and use that schema to validate the input fields for frontend validation.